
If you have landed on this page, you must have a fair idea about the Xender app and must be looking for ways to get Xender for Windows PC/Mac.
Table of Contents
Or maybe you want to transfer some files or documents from your mobile phone to a PC and look for the solution as to how it can be done.
If you are searching for any such type of tutorial, then you’ve come to the right place.
In today’s article, I’ll share 3 different ways to use Xender for PC.
All of these methods are easy to use and require no technical knowledge, hence you can choose whichever you are most comfortable with.
In today’s time when technology is changing so fast, every day new tools and devices come into the market to serve different purposes.
While in the old days, we used to have those mobile with black & white screens and they were only used for making or receiving calls, today it has changed a lot.
Also see: How to create WhatsApp account
Today, we have a smartphone that is used not only for making/receiving calls.
They are used as a replacement for a laptop for some people because what a laptop does, you can do it on your smartphone as well.
You can check e-mails, create documents, and live to chat with your friends through a messenger (Skype and others).
Xender has bought revolution and completely changed how we exchange files and documents across various devices.
You can use Xender to send files from one smartphone to another and from a smartphone to a laptop.
There are many features you might now be aware of, let’s take a look at some key features of the Xender app before we go ahead and see the ways to get Xender for Windows PC /Mac.
Key features of the Xender App:
- A very lightweight app with, an easy user interface.
- Send any type of files and documents.
- Send Audio/video files to other devices.
- It doesn’t use Mobile Data.
- Very high transfer rate that can go up to 40MB/s.
- Webversion is available.
- 500 million users exchange about 100 million files and documents per day!
- Supports iOS, Android, Windows PC/ Mac, and cross-platform transfers.
- No need for Data, Cable, or the Internet.
- Send files of unlimited size without any limitations.
- Supports all major languages.
How to use Xender for PC: 3 Ways
Let’s dive deep into learning how to use Xender for PC.
While earlier it wasn’t any way to use Android apps on PC, but today we have workarounds and even the official ways to use apps on PC.
Some of the well-known Android apps such as WhatsApp have a desktop client that users can install on their PC and use on PC.
But Xender hasn’t released a desktop client so far, although they have recently introduced Xender Web.
I’ll explain how you can use Xender Web to access Xender for PC.
There are two ways to use Xender Web on a PC.
- Via WEB CONNECT
- Via HOT SPOT
Let’s see how can we use both of the two ways.
Both methods are easy and secure, it depends on the user’s choice of which one they want to use.
Note: You must have to connect to the same network in order to use any of these two methods.
Via WEB CONNECT:
This method is quite simple. You need to follow the below steps:
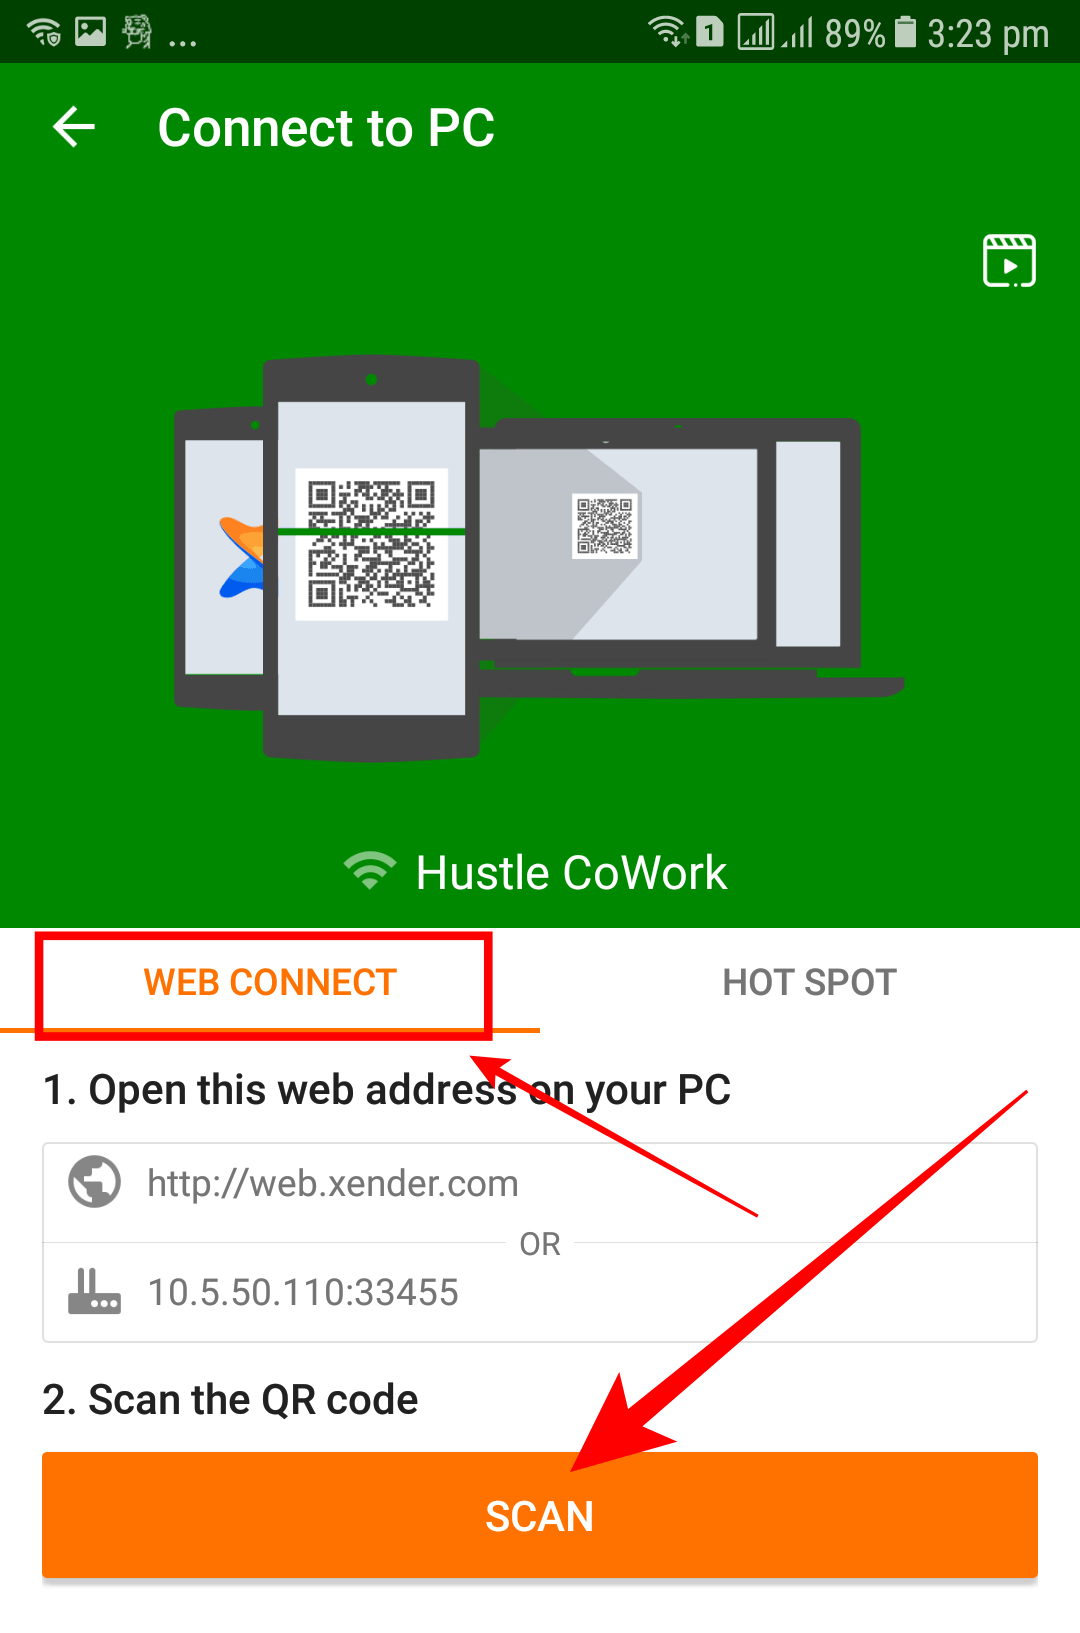
Step:1– Go to Google Chrome and open www.web.xender.com
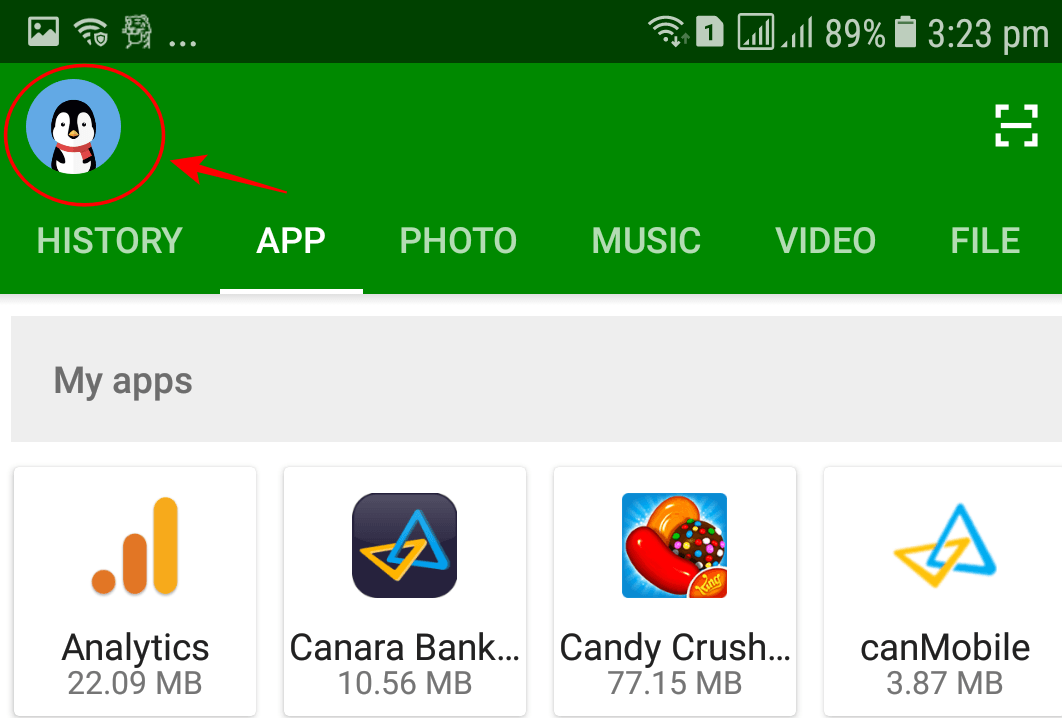
Step:2– Pick your phone and tap profile picture.
Step:3– Tap “Connect to PC”
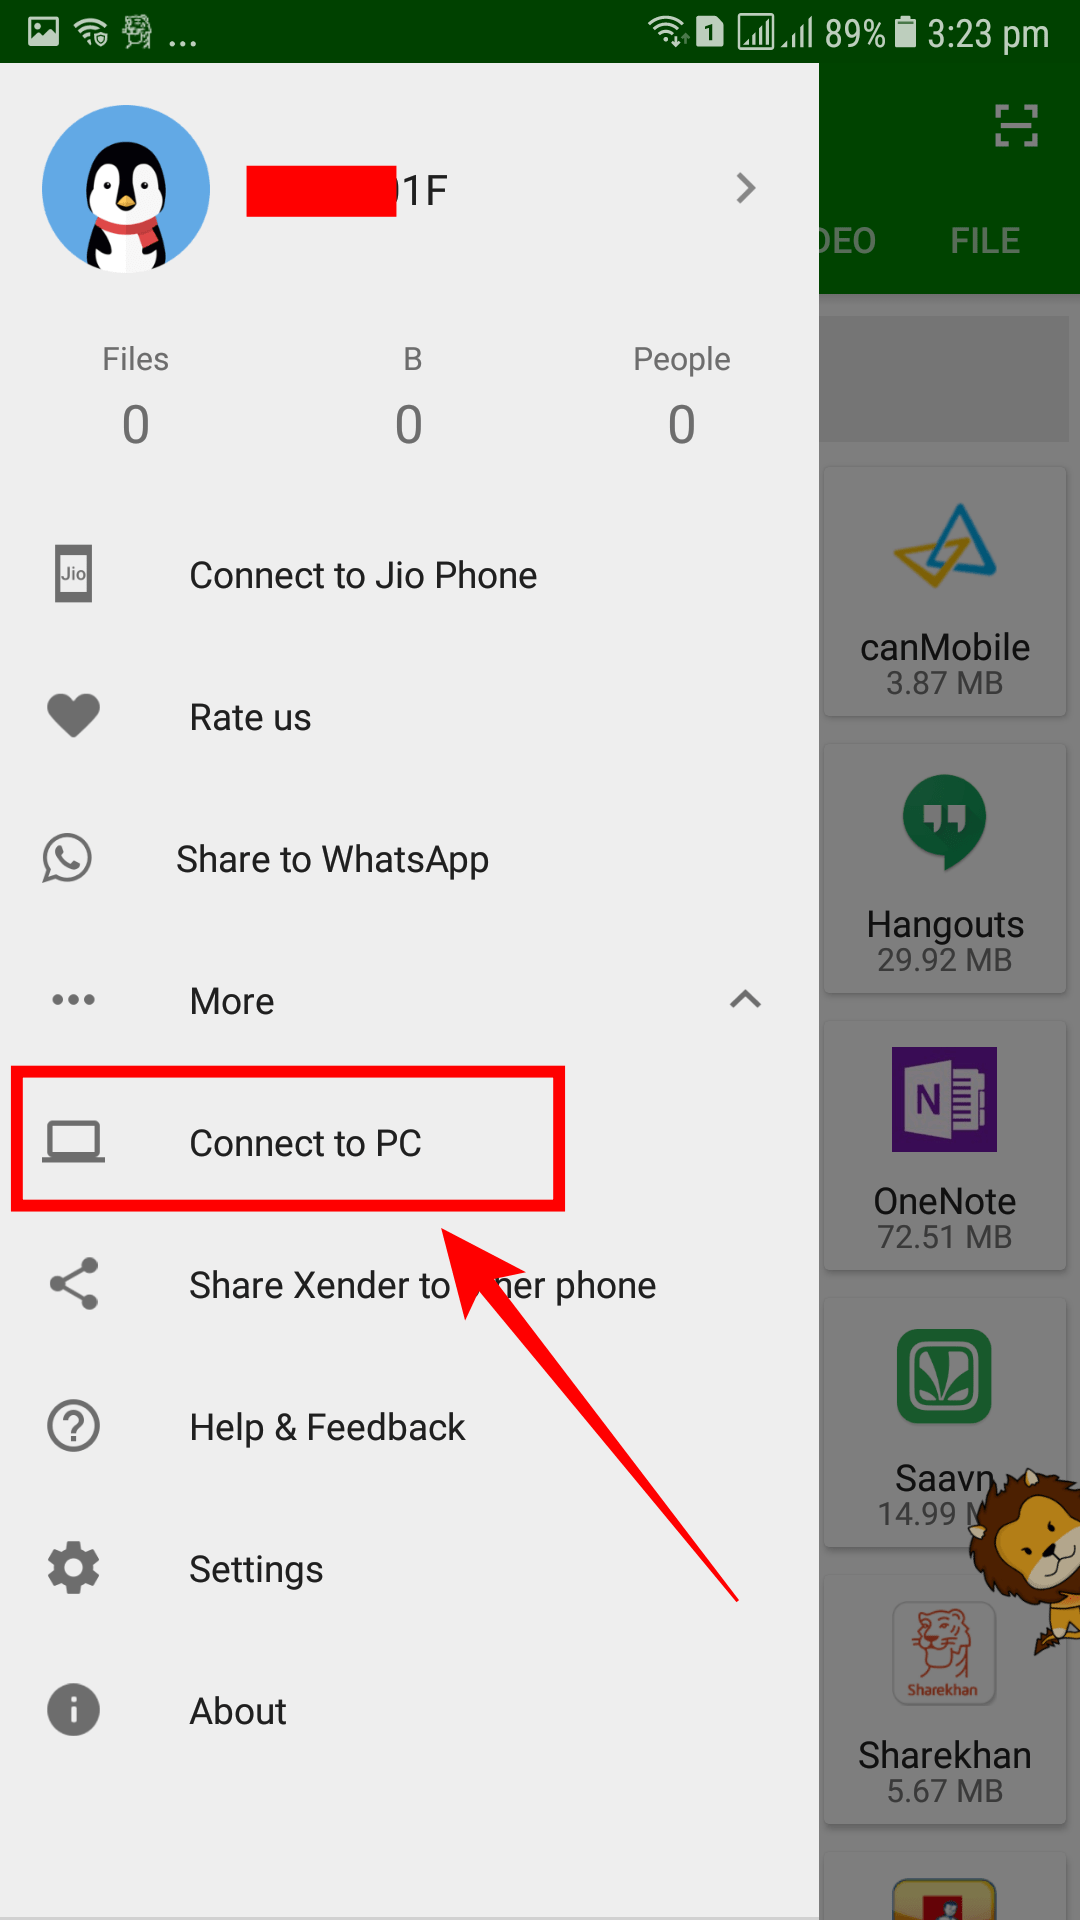
Step:4– Under the WEB CONNECT tab, tap the SCAN orange button, and a built-in QR scanner will be opened.
Step:5– Scan the code that appears on the PC screen. Once the scanning is completed, you will see all your files, documents, videos, and songs from your phone on the PC.
You can now download any file you want.
That’s all!
Via HOT SPOT:
This is yet another great way to use Xender on a PC. In this method, we still need to be connected to the same network. Here is how you can go about it.
Step:1– Pick your phone and tap Profile image.
Step:2– Go to “Connect to PC”

Step:3– Now go to the “HOT SPOT” Tab.
Step:4– Tap the “CREATE HOTSPOT” orange button and it will network.
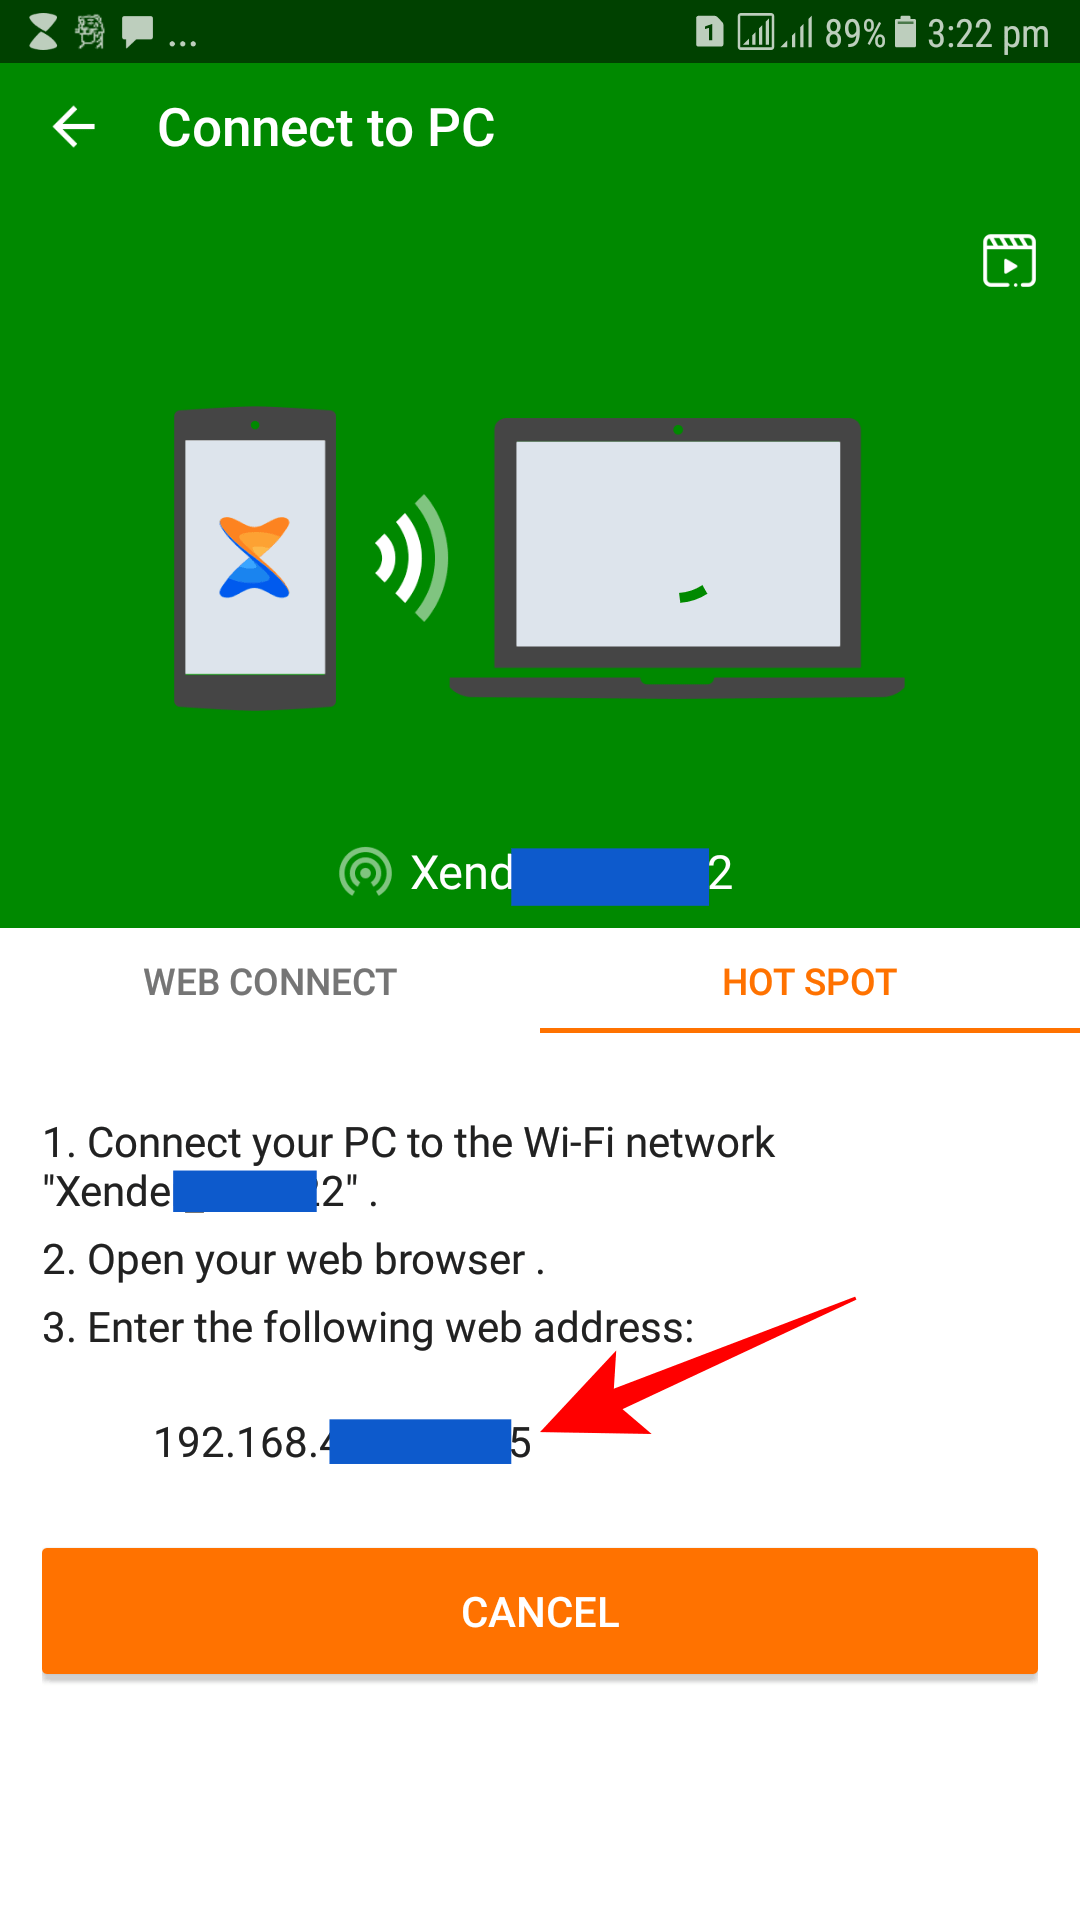
Step:5– Open your browser and type the IP that you see on the phone.
BOOM!
You will see all the files from your phone on the PC. That’s All!
Via Android Emulator
You can use Xender on your PC with the help of Android Emulators.
There are a lot of emulators on the internet but not all are good, only a few of them are good. One that I’ve been using for a very long time is BlueStacks.
BuleStack is one of the best Android emulators out there with an easy user interface. But it requires your PC to have a good configuration otherwise the engine wouldn’t start.
Your PC must have at least 2 GB RAM, Graphic Card, and an Intel i5 processor to use Bluestacks properly on your PC.
Here are the steps:
Step:1– Go to Google and download Bluestacks. Or click here
Step:2– Download and install Bluestacks.
Step:3– Go to the search bar and type “Xender”
Step:4– Tap to download and install Xender.
Step:5– Once the installation is done, you will see the Xender shortcut on the home screen of Bluestacks.
You can now use Xender on your PC.
Which Method is Best?
Whenever we use any software or service, we see how convenient it is for us. The same software which is convenient for me, may not be good for others.
The same thing goes here.
All the methods I’ve discussed are good, it depends on the user’s choice of which method they want to go for.
However, if your PC is not having a good hardware configuration, I’d suggest not going with the last method where you’ll have to download Bluestacks.
Because Bluestack is a heavy software and requires great PC specification.
Also, the PC should have a large disk space as its a large software and occupy a big space in your PC’s disk.
If anyone asks for my preference, I’d prefer to use Xender on PC via Xender WEB. I find it more convenient to use.