HP is one of the largest technology companies in the world with plenty of award-winning products under the product line. It is a leading manufacturer of Desktop computers, laptops, tablets, Printers, and other computer peripherals such as Keyboard, Mouse, Webcam, etc.
Table of Contents
Since the use of a computer/laptop has become a necessity, people spend a lot of time performing different tasks on the computer and exploring different options.
They are getting more use-to of the different features of Computers yet some of us face difficulty in performing some tasks and how to take a screenshot on an HP laptop or desktop computer is one of the most common tasks.
And, in today’s post, I’ll discuss some of the easiest & quicker methods of taking screenshots on your HP laptop or a desktop computer.
Keep reading!

The screenshot is important when you are getting some issues resolved with the customer team. For example, the money transfer that you made to your friend through a wire transfer gets failed.
The amount gets deducted from your bank account but the receiver hasn’t received it. In that case, the bank may ask for the transaction screenshot to resolve the matter.
Similarly, if your internet speed is slow, the ISP may ask for a screenshot of the test results from Ookla to know to troubleshoot your problem.
So screenshots have become very common these days and you know know how to take screenshots on laptops, desktops, and other devices such as tablets.
This article focuses on taking screenshots on HP laptops or HP desktop computers. If you want to learn how to screenshot on other devices, you can browse other articles on this website.
Methods to take a screenshot on an HP laptop or Desktop Computer
There are several methods to take screenshots on HP laptops or desktop computers.
You can screenshot on an HP laptop using a keyboard shortcut, using a built-in screenshot app, or a trusted third-party app that you can download and install on an HP laptop or a desktop computer.
Among these methods, the quickest method is using keyboard shortcuts but in that case, you’d require an editor to edit the screenshot & save it.
However, with a built-in app or a third-party app, you can edit the screenshot there only and save the final Screenshot.
I’m going to discuss all of these methods, one can use any of them based on their convenience.
Method-1:Keyboard Shortcuts
As I said keyboard shortcuts are the quickest method to take a screenshot on an HP laptop and desktop computer.
However, you’d require a photo editor in case you want to crop the screenshot or add text.
With the keyboard shortcut method, you’ll capture the whole screen of your laptop or desktop computer, you can not select any part of the screen.
The partial screenshot isn’t a thing with a keyboard shortcut. However, it is good if you want to capture the whole visible screen.
Here are the steps!
Step 1– Get on the screen you want to capture. It could be the desktop screen or a website that you want to take a screenshot of.
Step 2– Press the “PrtScr” key on the keyboard & it will take a screenshot and get copied to the clipboard. If you don’t find the “PrtScr” key, look for one with a similar name to “Print Screen“. The key for the screenshot/print screen is generally placed in the top right corner of the keyboard, close to the “Delete” key.
Step 3– Open your favorite image editor and press the “Ctrl” + “V“. It will paste the screenshot and you can edit if required.
Step:4– Click on “Save“. Name the file and hit the Save button.
That’s all!
Method-2: Keyboard shortcut (Alternative to method-1)
Step:1-Get to the screen you want to capture.
Step 2– Press “Shift+Windows+S” and the screen will get dim for a moment.
Step 3– The cursor will change into a crosshair. Select the portion on the screen with the mouse click & release it.
Step 4– The crosshair will disappear and the selected portion will be captured and copied to the clipboard.
Step 5– Open an image editor and press “CTRL+V“.
Step 6– Save the screenshot in the preferred format. JPEG Or PNG.
Also See: How To Crop A Screenshot On A Mac
Method-3:Using Snipping Tool
The Windows Laptop/Desktop computer comes with a built-in screenshot-capturing app called Snipping Tool. If you don’t want to try the first method because you’d require a separate editor tool, you can go for this option.
The Snipping app has basic editing tools such as cropping, inserting text, or highlighting something in the screenshot.
The advantage of this method over the first one is that you can screenshot freeform, rectangular, Window, or full screen based on your requirement.
Here are the steps
Step 1– Get on the screen you want to capture.
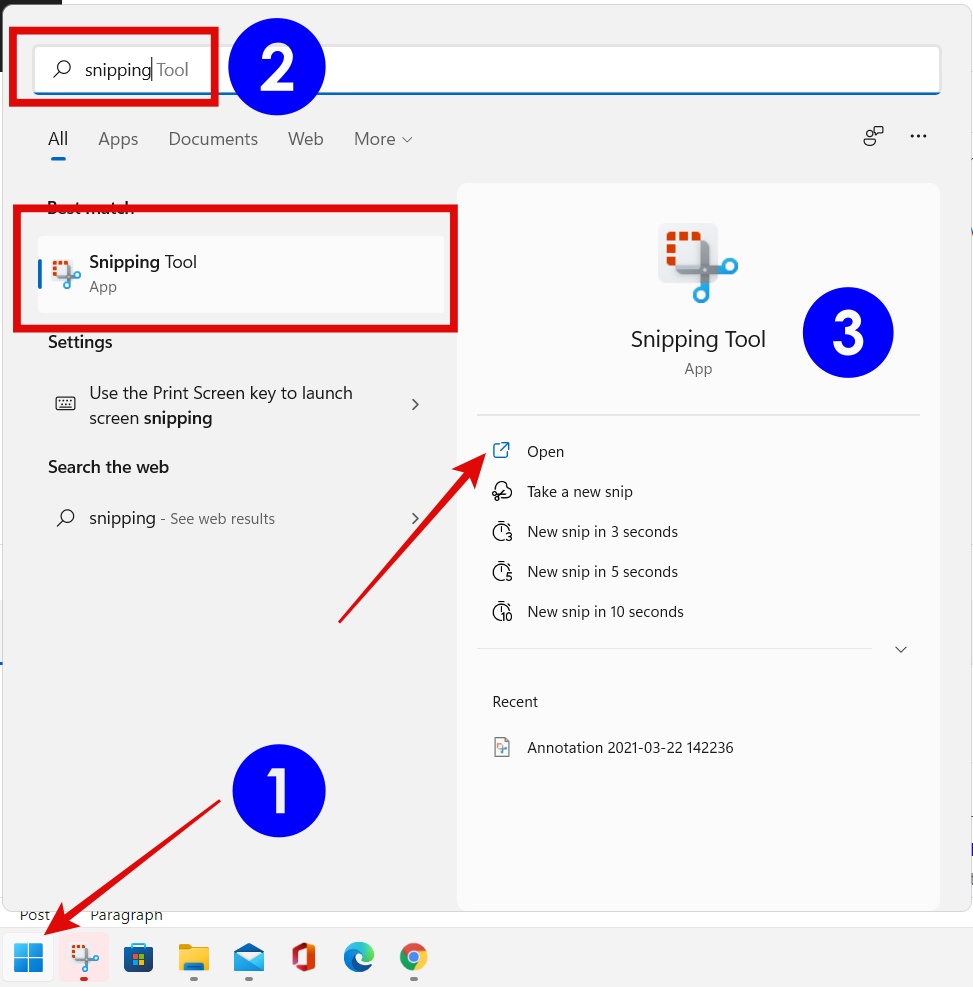
Step 2– Click the start button and search for Snipping Tool. Open the app and move on to the next step.

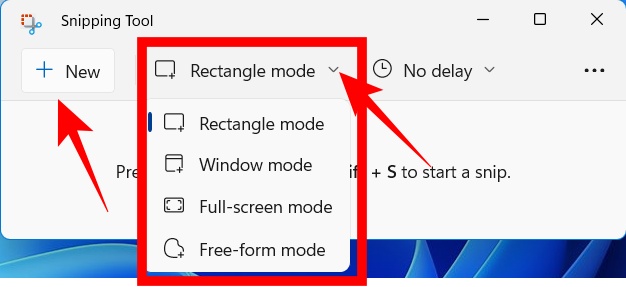
Step 3– Click on “New” and then you can select if you want freeform snip, rectangle, or any other. However, you can pre-select it as well by clicking on the downward arrow as depicted below image.

Step 4– Select the area by pressing the left click of the mouse and dragging. Finally, release the mouse click to capture a screenshot. If you have selected Windows or Full-screen mode, you’d not require to select an area. It will capture the whole window or laptop screen.
Step 5– Next you can perform the basic editing task if needed.
Step 6– Save the file to your preferred location. That’s all.
Method-4:Using Chrome Extensions
This is one of my favorite methods to take a quick screenshot in a browser.
This method is a good choice if you want to take a screenshot of any website you have opened. You can not take a screenshot of the computer desktop or any file or folder on the computer.
This method works with the Chrome extension. There are plenty of good chrome extensions that can be used for taking a screenshot on an HP Laptop. The one I prefer is Awesome Screenshot.
Steps to use this method.
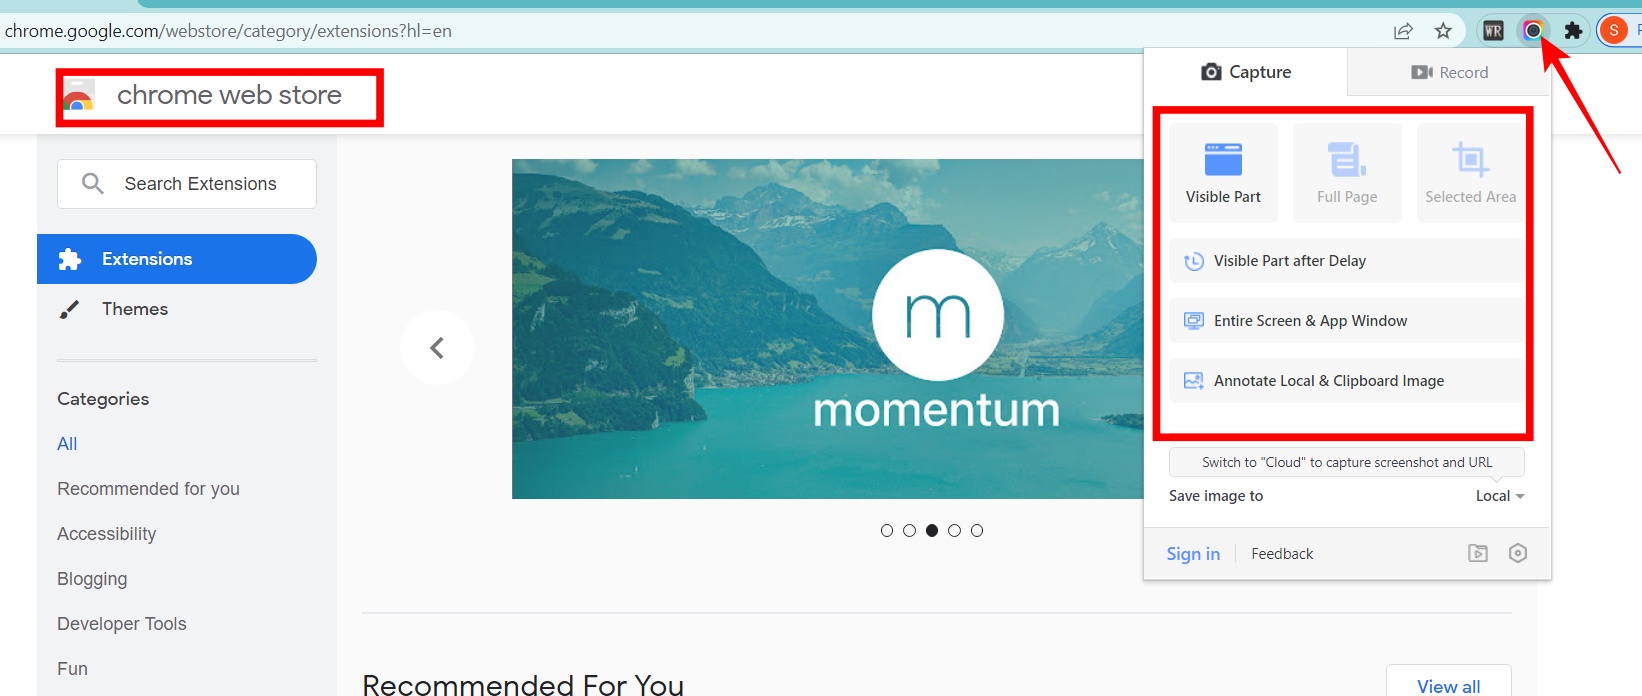
Step 1– Go to https://chrome.google.com/webstore/category/extensions and search for Awesome Screenshot.
Step 2– Add the Awesome Screenshot extension in Chrome Browser.
Step 3– Once the extension is added, Click on it and you’ll have several options under the “Capture” tab. You can take screenshots of the Visible area, Fullscreen or Selected Area.

Step 4– Choose the mode as per your preference. For example, if you want to screenshot the visible part, select it and it will screenshot the screen and open It in a new tab.
Step 5– You can do the basic editing tasks and save the file to your preferred location on the laptop/computer.
Also See: What is about:blank & How to Remove It

